FREE STANDARD SHIPPING FOR ORDERS OVER $170!
FREE STANDARD SHIPPING FOR ORDERS OVER $170!
Glues & Liquids
Eyelash Extensions
ACCESSORIES
Crafting the Ideal Lash Fans for Volume Eyelash Extensions
April 18, 2024 3 min read

Our Top Picks for Fanning Techniques in Russian Volume Lash Extensions
Just like hunting for the perfect wedding or formal dress, discovering your go-to fanning method can involve a lot of trying on until one just clicks! Once you nail your fanning technique, creating flawless fans will become second nature. So, what constitutes the IDEAL fan?

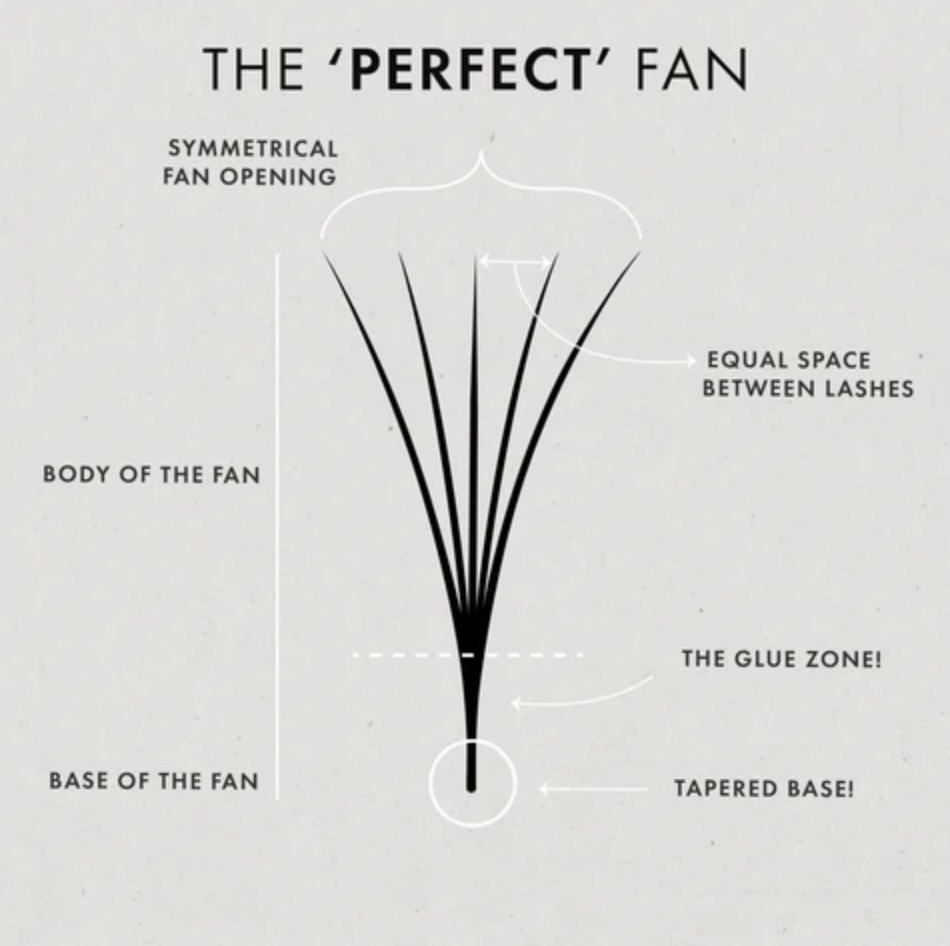
Firstly, SYMMETRY is key. This means each space between the lashes is evenly distributed! Keep in mind, the spacing will vary with the size of your fans. For instance, 2D fans will naturally have wider gaps between lashes, while 3D fans will be tighter, and the gaps get progressively smaller with 4D and so on.


The SPACING within a fan determines if it's narrow, standard, or wide. Crucially, if a fan's opening isn't even, it can result in a skewed or closed appearance (every lash technician's nightmare!). Imagine crafting a 5D lash look and three lashes end up closed; this fan would stick out awkwardly among the symmetrical 5D fans, leaving an undesirable 'gappy' finish instead of the sought-after lushness.
Another vital aspect is the FAN'S BODY, making up two-thirds of the fan, while the BASE OF THE FAN should be about one-third. REMEMBER, the fan's base must be tapered to avoid splitting, ensuring it adheres correctly and minimises the risk of poor retention, stickiness, and discomfort for your client.
The ‘Perfect Fan’ also hinges on the GLUE ZONE. Positioned at the fan's base, this 2mm section must be dipped into the adhesive. Dipping less than 2mm can lead to retention issues.
Always tailor the thickness of the lashes used for your fan to your client's natural lashes to avoid damaging them with heavy or oversized fans.
The general guideline is:
- Mega-Volume sets: 0.03/ 0.04 lashes
- Volume up to 9D: 0.05 lashes
- Volume up to 5D: 0.07 lashes
- 2D Volume: 0.10 lashes
This will vary based on the client's desired outcome - a full 3D set can be achieved with 0.05 lashes for a lighter, fluttery appearance!
When it comes to actually creating the PERFECT fan, there's a variety of methods to explore! You might go through some trial and error as part of the learning process to find what works best for you. Here are our TOP 3 fanning techniques for crafting the PERFECT fans for your clients...
Lonely Fan Method
This technique involves isolating the desired number of lashes for your fan from the bunch, then repositioning them further down the strip. Using the tip of your volume tweezers, gently roll the lashes outwards to form a fan. Secure the fan with a firm grip, dip it in the adhesive, and apply to the natural lash. It’s a popular choice for beginners due to its simplicity and effectiveness, ideal for attaching to either the top or bottom of the lashes.

Rainbow Method
Also known as the rolling technique, the Rainbow method builds on the Lonely Fan approach. Instead of moving the chosen lashes, you leave them in place, use your tweezers to roll the lashes sideways, forming a fan. This technique is great for creating a more 'stacked' base, perfect for attaching the fan to the side of the natural lash.

Pinching Method
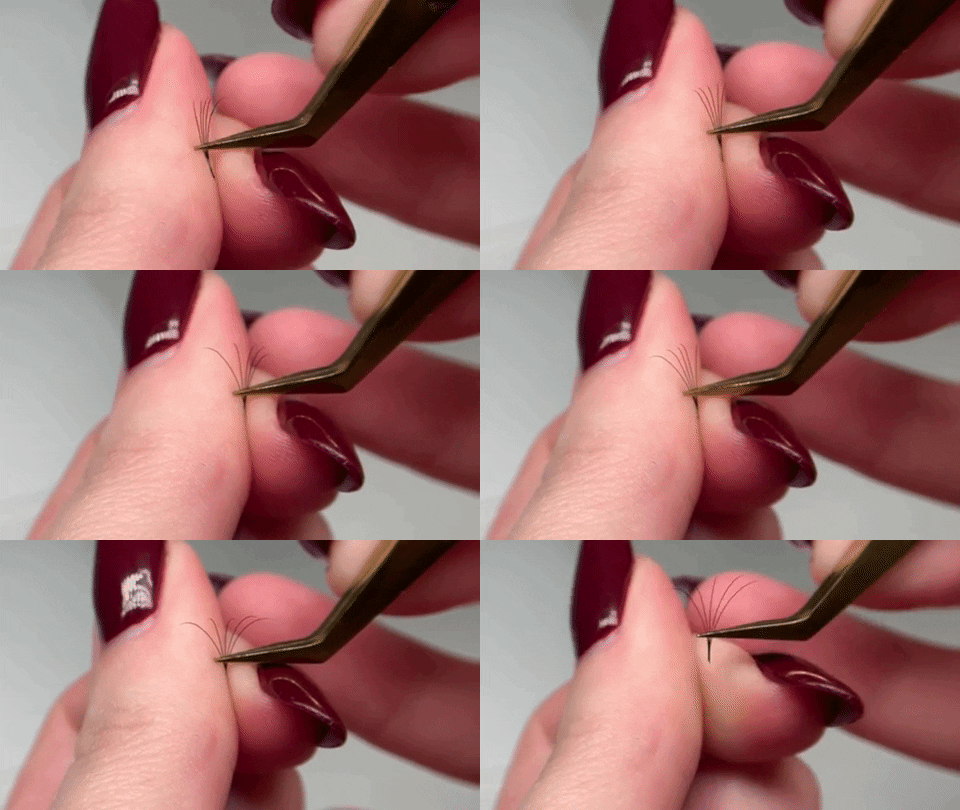
The pinching method might look straightforward, but mastering it requires a bit of finesse to avoid twisted bases. Start by selecting the lashes you want from the strip, placing them between your thumb and index finger at the first knuckle of each, while keeping hold with your tweezers. When the lash base is secure between your fingers, gently loosen your grip with the tweezers and simultaneously pinch the base together with your thumb. Avoid rolling the base to prevent twisting. This method is known for its effectiveness in opening the fan more by wiggling with your tweezers while pinching the base with your thumb and forefinger. When you've achieved the perfect fan, secure it with your tweezers, dip in glue, and attach to the natural lash. Though challenging, this technique is incredibly rewarding to master and mesmerising to perform, making it well worth the effort.

Ultimately, perfection in fan creation is a result of practice and persistence. Remember, some techniques might initially be challenging, but with continual practice, they'll become intuitive.
Check out these featured products
Subscribe
Sign up to get the latest on sales, new releases and more …


